
Installing Bootman, the BeOS Boot Manager
Intel Architecture Platform
This document is a guide to installing the BeOS boot manager, Bootman, which allows you to choose which operating system to boot into when you turn on your computer.
This document is aimed at people using the BeOS Release 4 for Intel Architecture.
Quick links to sections on this page:
Introduction to OS Management
Bootman Warnings and Limitations
Installing Bootman
Uninstalling Bootman
This page was last updated on December 15, 1998.
Introduction to OS Management
At last count, there are well over three dozen different operating systems available for Intel Architecture computers. While many of them are obscure, there are at least a dozen "brand name" operating systems for PCs, including Windows, Windows NT, Linux, FreeBSD, and the BeOS.
While many people's needs are well-served by a single general-purpose operating system, many others find that they like to use more than one OS, using the right tool for the job at hand. For example, using Windows when you want to run Office, using the BeOS to handle digital audio editing and manipulation, and using Linux for running a web server.
A single PC can have all of these operating systems -- and more besides! -- installed on it. There are two tricks to having more than one OS on the same system, installing them, and booting them. This document discusses the second trick, how to boot between multiple operating systems which are already installed on your computer.
When your computer starts up, it has to choose which operating system to start using, that is, which OS to boot into. If you have only one OS, that's easy, but when you have more than one, you have to have a way to choose between them.
Generally, this is done with a very small program that lives in your Master Boot Record (or MBR). Without being too technical about it, this is the first place your computer looks on your hard disk for an operating system. The small program runs, and shows you a short menu of your choices. You choose, and the program jumps to that operating system, so it can boot. These small programs are called boot managers.
There are a variety of boot manager options out there. There are several excellent commercial boot managers, including V-Comm's outstanding System Commander Deluxe. Many operating systems, including Windows NT, Linux, and the BeOS include their own boot managers.
Covering other boot managers is beyond the scope of this document; those other boot managers come with their own instructions. We will simply talk about the very decent boot manager that comes with the BeOS. It's better than the boot managers that come with Windows NT and Linux, but not as good as shareware and commercial offerings like PowerBoot or System Commander.
The boot manager for the BeOS is named Bootman. When you install the BeOS, you're given the option of installing Bootman. If you choose not to install Bootman then, or if your system came with the BeOS pre-installed but without a boot manager, you may want to be able to install Bootman without going through a full BeOS installation. This document will show you how to do it.
Bootman Warnings and Limitations
Before you install Bootman, you need to make sure you can install it. You should not install Bootman if any of the follow is true:
- You have a very old computer and an 8 gigabyte or larger hard drive, and you may have installed software that extends your BIOS, such as Maxtor's MaxBlast or Ontrack's Disk Manager. These packages use the MBR themselves, and will conflict with Bootman, or any other boot manager.
- You already have a boot manager on your system. Why fiddle with something that is already working?
- The BeOS is the only operating system on your system. You don't need a boot manager at all.
Installing Bootman
- First, boot your BeOS system, probably by using the BeOS Boot Floppy which came with your BeOS installation. The BeOS Boot Floppy is labeled "Installation Disk for Intel Pentium".
- Once in the BeOS, launch Terminal by choosing it from the Be menu (it's in the Applications submenu).
- Type
bootmanand press Return.The Be Boot Manager installation wizard will appear to lead you through the process of installing Bootman:
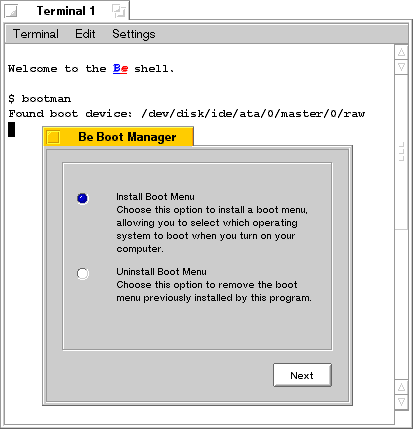
- Make sure the Install Boot Menu option is chosen, and click
the Next button.
You will move to the next panel of the installation wizard, which saves the Master Boot Record information for your original configuration. This MBR save file will allow you to Uninstall Bootman, should you need to do that in the future:
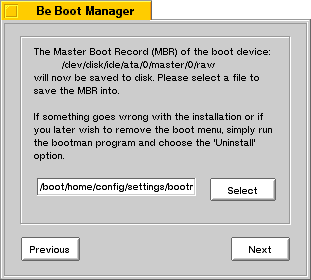
- Leave the default MBR save location alone (this lets you use the defaults
if you need to Uninstall), and click the Next button.
The next panel allows you to create a rescue disk:
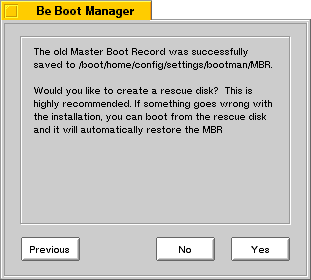
- You should always create a rescue disk; information about how
to use the rescue disk is at the end of this document. Click the Yes button.
The next panel of the installation wizard prompts you to insert a floppy disk:
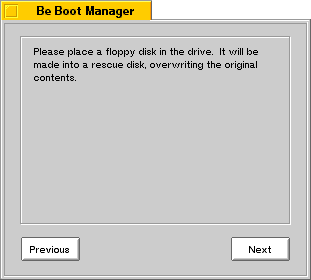
This floppy will have the rescue information written to it. This will erase the previous contents of the disk.
- Insert a floppy disk into your computer, and click the Next button.
After the Be Boot Manager creates a rescue floppy disk, you will be prompted to eject the floppy from your computer:

It is very important that you eject the floppy at this time. If you leave it in your computer and reboot your system, it will automatically Uninstall Bootman, and you'll have to start all over again.
- Eject the floppy disk from your computer, and click the OK button.
You will move to the next panel of the installation wizard, which shows you which bootable volumes the Be Boot Manager found on your system:
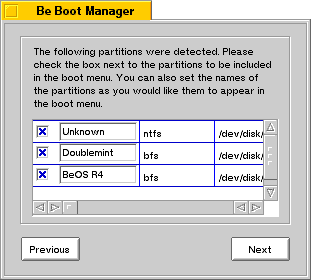
- Look at the list closely, and make sure that every bootable volume
on your system is checked. Uncheck any volumes which are not bootable. You
can also change any boot volume's entry in the boot menu (this only changes
the boot menu, not the actual volume name). Select the text to change with
the mouse...
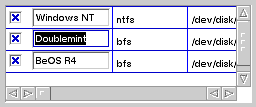
...and rename the boot volume's menu entry:
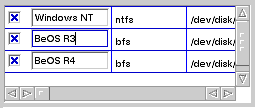
- When the boot volumes list is configured the way you want it, click
the Next button.
You will move on to the boot options panel.
- Choose the default boot volume from the pop-up menu (choose the BeOS
R4!), and select how long the system should wait before automatically
booting into the default choice:
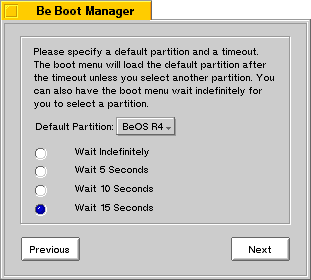
- When the boot options are configured the way you want them, click
the Next button.
You will move on to the boot details panel:
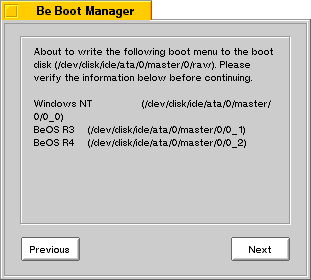
- Double-check the settings which are displayed. When you're sure they are
correct, click the Next button.
You will be presented with the confirmation dialog:

- If you are certain that your settings are correct, and that you wish to
install the BeOS Boot Menu into your Master Boot Record (go back and re-read
those disclaimers if you're not sure), click the Yes button.
The Be Boot Manager will tell you it successfully installed the boot manager software:
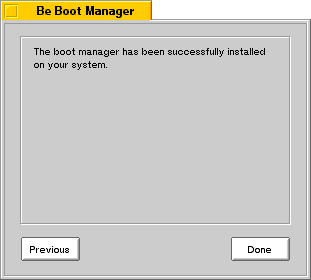
- Click the Done button.
The boot manager installation wizard will quit, and you will return to Terminal.
You've finished installing the BeOS boot menu onto your system. You should test Bootman out, by rebooting your system and choosing each boot volume option from the boot menu, and ensuring that every option boots your system correctly. If it doesn't, you may want to Uninstall Bootman, as described below.
Uninstalling Bootman
If for some reason after you install Bootman you decide that you need to uninstall it, or if some of your boot volumes are not accessible using Bootman, you may need to use the Be Boot Manager to Uninstall Bootman. There are two different ways to do this:
- Use the rescue floppy disk. This is the easiest method:
- Insert your rescue floppy disk into your computer.
- Reboot your system.
- When prompted to restore your Master Boot Record, press the Y key. The MBR will be restored.
- When prompted, eject the rescue floppy and then press any key to use your old Master Boot Record to boot your system.
- Use the Uninstall Boot Menu option of the Be Boot Manager
application. This option allows you choose the Master Boot Record save
file to restore to your system, something you cannot do with the rescue
floppy. You can also use this method if you do not have a rescue
floppy.
- Boot your BeOS system. If necessary, use the Boot Floppy that came with the BeOS to boot your computer.
- Launch the Terminal application.
- Run the Be Boot Manager installation wizard application, by typing
bootmanin Terminal.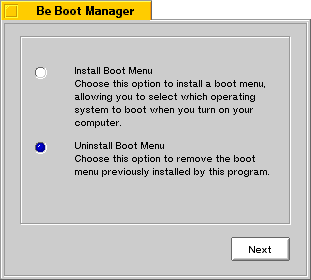
- Choose the Uninstall Boot Menu option, and click the
Next button.
You'll now be asked to locate a Master Boot Record (MBR) save file, with the old MBR you want to restore:
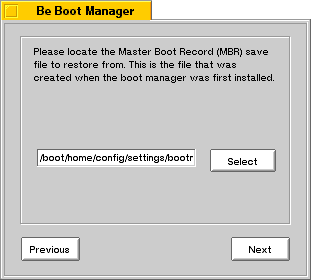
- Locate the MBR save file. If you saved your MBR in the default location when you installed Bootman, you can use the default value here.
- Click the Next button.
You will be asked to confirm that you wish to overwrite Bootman with the old MBR file:

- Click Yes to restore your MBR file.
You will see the confirmation panel.
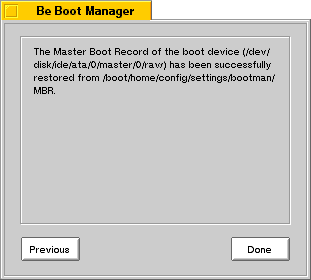
- Click the Done button to quit the Be Boot Manager application.
Your old MBR is now restored. If you had a boot menu installed before you installed Bootman, you should be able to use it once again. Otherwise, your system will boot into the default operating system, probably the one installed on the first partition of your hard disk.
Copyright © 1999 by Be, Inc. All rights reserved. Legal information (includes icon usage info).
Comments, questions, or confessions about our site? Please write the Webmaster.