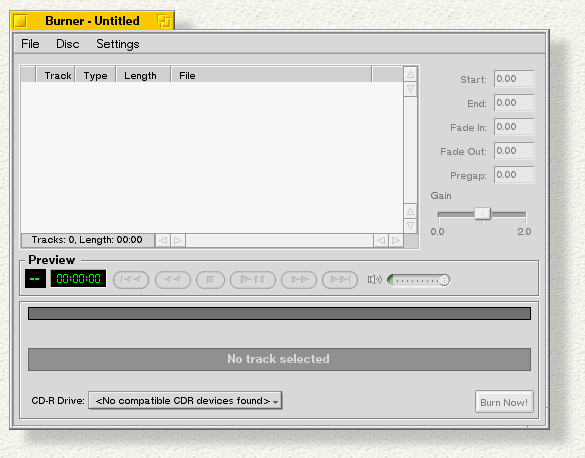
 CDBurner

The CDBurner
application lets you compile the contents of an audio CD and burn it to a disc. In order to do this, you need a sound card (so you can hear audio files) and a CD-R drive.

Before you get started, here are some things to keep in mind:
-
CDBurner
makes CDs in "disc-at-once" mode. You can't add a track to a disc after you've already started to burn it; you have to compile and burn the entire CD at once.
-
You can use any media file that has an audio track.
-
You'll get the best results with uncompressed WAV or AIFF files in 16-bit stereo with a 44.1kHz sample rate. With input files in this format, CDBurner
doesn't have to resample the audio it's processing, which results in more accurate sound reproduction on the CD you burn.
-
If you delete files elsewhere on your hard drive that are included in a saved CDBurner
project the files are deleted from the project. This is because the files that appear in the CDBurner
window as you compile the contents of a CD are referenced by path name to the actual files, but are not the files themselves.
Here's how to use CDBurner
:
-
Launch CDBurner
to open a project window.
-
In the lower-left corner of the panel is pop-up menu with the names of all CD-R devices attached to your system. If you have more than one device, you can select it here. If you have no CD-R device, the popup tells you it cannot detect a device.
-
Drop the files--each becomes a track--you want to include on your CD into the project window (you can download files to practice with from any number of Web sites). Add more tracks or delete them via the Disc
menu. Choose Open Project
from the Project
menu to bring up a Burner
window with a saved work-in-progress.
-
Click on a file to highlight it; notice the time fields (which are live unless the file is playing) to the right of the Tracks
window. The fields are Start
and End
time, for the length of time into the beginning or from the end of a file you that want it to start or stop playing; and Fade In/Fade Out
to set the length of time to fade from no sound to normal volume and back again. You set Start/End
times by typing in the specific field or by dragging the redTrack Length
sliders at the ends of the Track Length Bar
(the lower of the two bars at the bottom of the window). Drag the left slider to the right to shorten the track at the beginning and drag the right slider to the left to shorten it at the end. Grab the small Fade Arrow
in the center of the left or right Track Length Slider
to select fade times. Changes you make with the sliders are reflected in the time fields.
-
Pregap
accounts for the sound between tracks, such as crowd noise on a live recording. If Pregap
sound is between tracks 1 and 2, it's actually part of Track 2--although if you skip from one track to another, you don't hear the Pregap.
You can set the Pregap
with the small upward-pointing arrow slider in the Track Length Bar.
-
The Gain
slider below the preceding settings sets the volume for a specific track as it will be on the disc; that is, Gain
makes the sound of a track as burned louder or softer.
-
The Volume
slider to the right of the standard play controls affects the sound level of playback--what you hear through your speakers.
-
Once you're satisfied with your contents and the adjustments you've made to the tracks, choose Project > Save
to save your work.
-
With a burnable disc in your CD burner, click Burn Now!
-
The CDBurner
window shows a buffering progress window that indicates the conversion of data to CD format. A dark green progress bar changes to light green to indicate the percentage of the burn completed; a counter increments to show the same thing. Note that during the burn process only the Abort
button is enabled; if you click it your disc becomes a coaster.
-
If the burn doesn't work, you'll see a specific error message that tells you why not.
 CDBurner

 CDBurner

