 Network Preferences

 Network Preferences

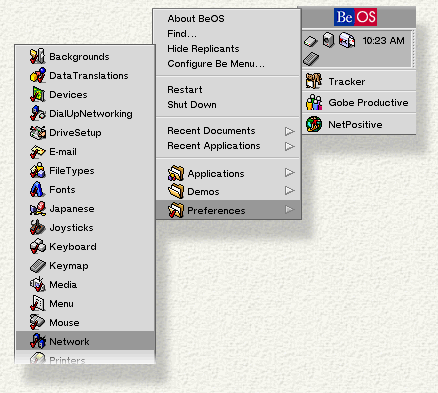
If you're connecting to the Internet (or to a local network) through an ethernet card, you need to use the Network preferences application to configure your connection. To launch Network, click on the Be logo, open the Preferences item, and click on Network :

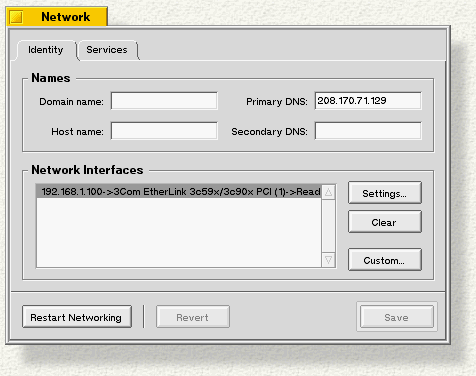
When you launch the Network preferences, you see this panel:

You fill in the Names section of the panel with information you get from your ISP or network administrator.

|
If you're creating a stand-alone network, see the section "Setting Up a Stand Alone Network" for instructions on what to fill in here. |
In the Network Interface list you should see an entry for each card that's plugged into your computer. To configure an entry in the Network Interface list, select the entry and click Settings....
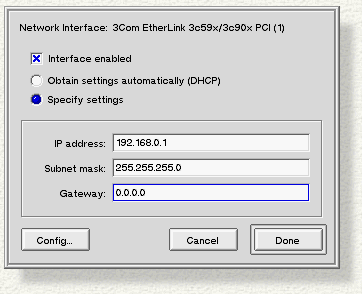
The Settings... (or Custom... panel) looks like this:

Interface enabled, which is on (checked) by default, tells the system that this card should be used for network transactions. If you only have one card, leave it enabled; if you have more than one, you should enable the one(s) you want to use (and disable the others).
If there's a DHCP server on your network, click Obtain settings automatically (DHCP) and let the system get the numbers for you. Otherwise, click Specify settings and fill in the information yourself.

|
If DHCP can't get all the information for you, switch to Specify settings, fill in the missing info, and then switch back to Obtain settings automatically (DHCP). |
When you're finished configuring the card, click Done (or Add if you're configuring a jumpered card), or Cancel to abort. The Network panel should now display your card's address, and should list the card as "Ready" (or "Disabled" if you unchecked Interface Enabled).

|
If you're identifying a jumpered device, the Config... button lets you set the port, IRQ, and address. You shouldn't modify the default settings unless you know what you're doing. |
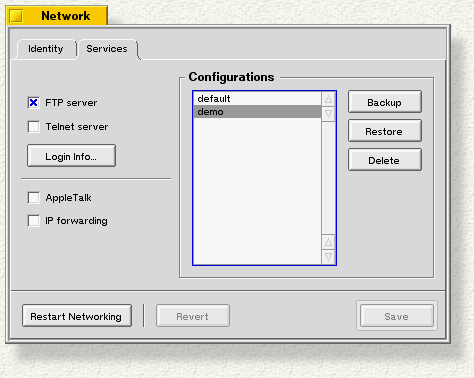
To configure your computer to accept FTP and Telnet connections, to tell it look for an AppleTalk network, or to enable IP forwarding, go to the Services tab:

FTP server and Telnet server. Check these box if you want other computers to be able to download files from your BeOS system (FTP) or log in to your computer from the outside (Telnet). Then click Login Info... and enter a name and (optionally) a password, and press Done. Both the FTP and the Telnet servers use the same login name and password.
AppleTalk. Check this if you want to print to an AppleTalk printer.
IP Forwarding . Check this if you have one local area subnet connected to another. The other systems on your local network should use your IP address as their gateway (or router) address.
Once you're done configuring your network, you should save the settings in a backup file by clicking Backup (i.e. "create backup"). If something happens to your network configuration, you'll be able to Restore your settings from the backup file rather than typing them in again. You can also use backup files to create different configurations that you can choose from later.
When you're ready to use your configuration, click Save or Restart Networking. The former saves your settings as the default, the latter applies your settings but doesn't save them.

|
Restarting networking interrupts currently running network operations, such as retrieving mail or downloading a Web page. |
To test your network connection, launch NetPositive and try to connect to a known Web site (such as www.be.com). If the connection is refused (and you should try a few different sites just to make sure the trouble is on your end), click Restart Networking again. If you still have no luck, check all your settings in the Identity tab.
You may want to connect your BeOS system to other computers in a stand alone Ethernet network. The other computers on the network can be running BeOS, Windows, MacOS, or a Unix-based operating system.
Launch Network and fill in the Names section of the panel so that the domain and host name are blank, and the two DNS settings are "0.0.0.0".

Click Settings... (or Custom..., as described in the previous section) to bring up the configuration panel.

Set the IP address to "192.168.0.N ", where N is a number between 1 and 254 (inclusive).
Set the Subnet mask to "255.255.255.0".
When you're finished, click Add....
Unless you configure one of the computers on your network to act as a DNS, you won't be able to reach the other computers by name. You'll have to use their IP addresses instead.
You may want both a stand alone network and a modem connection to the Internet. To do this, simply set up a stand alone network as described above, and then add a modem configuration, as described in Dial-up Networking.
When you attempt to access a service that's not on your stand alone network, the BeOS initiates a PPP connection. While connected to the outside network by modem, you can still communicate with any device on your local network.