 The Desktop

 The Desktop

When you boot BeOS for the first time, you see a desktop that looks like this:
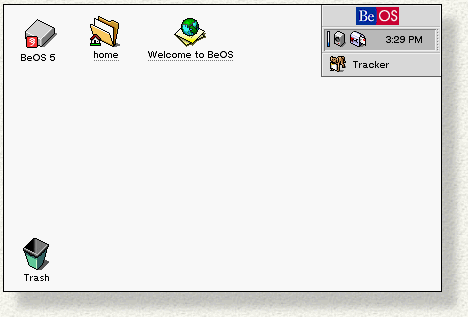
On the desktop you'll see these images:
|
This is the disk (or partition) where you installed BeOS. You can see other disks--for BeOS, or even for other operating systems--by mounting them, as described in "Mounting and Unmounting Disks," below. |
|
|
The home folder is reserved for files and folders you create (or that BeOS creates on your behalf). It contains, among other things, your mail folder and a query folder that stores queries that you make with the Find feature. |
|
|
Welcome to BeOS is a welcome letter that contains links to the online documentation, including an electronic version of the BeOS User's Guide. |
|
|
The Trash is where you drag files you want to dispose of. It's described more in "The Trash," below. |
|
|
In the upper right corner of the desktop is the Deskbar. This is the BeOS roster of system services and applications, as explained in detail in "The Deskbar." |
If you click and hold on an unoccupied area of the desktop, the desktop context menu
pops open.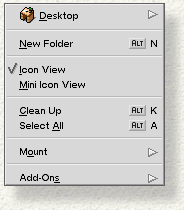 The menu contains these commands:
Desktop represents the folder that holds the items that are on the desktop. Hold the mouse over this item for a moment and a menu that displays the contents of the Desktop folder will pop open.
New Folder creates a new folder and places it on the desktop.
Icon View and Mini Icon View tell the desktop to display large or small icons. The mode that's currently selected is checked.
Clean Up aligns the icons on the desktop so they fall into a neat grid.
Select All selects all the icons on the desktop (so you can shift them on the screen as a group, for example).
Mount pops open a menu of disks that are mounted or that are available to be mounted (described below).
Add-Ons is a menu of "modules" that perform a variety of operations. Add-ons, which are described in Add-ons, allow third parties (and BeOS itself) to extend the functionality of the desktop and other areas of BeOS.
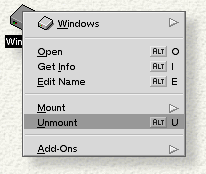
Each of the icons on the desktop has its own context menu. Context menus for folders and files are identical to the Tracker's File menu, as described in Playing with Files and Folders. The context menu for a disk provides some basic operations on the disk (Open, Get Info, Edit Name), and lets you unmount the disk, as described next.
Mounting a disk makes its contents available to the operating system. To mount a disk, choose the Mount command in the desktop context menu. This pops open a menu of disks (or, more accurately, partitions or volumes) that are currently mounted or that are available to be mounted..
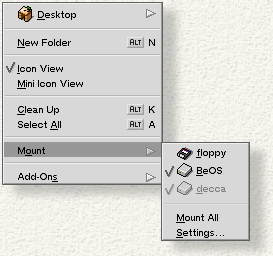
Disks that are already mounted are checked. The disk that you're booted into is disabled (light gray) to show that it can't be unmounted
To mount an unmounted disk, simply select the disk in the Mount menu. When you mount a disk, a disk icon is placed on the desktop. To mount all disks, select Mount All. The Settings... command brings up a panel that lets you fine-tune the process by which disks are automatically mounted.
As implied by the illustration, BeOS can mount disks that contain files from other operating systems. The "Windows" disk, for example, contains files for Windows (presumably). You can view files from other file systems (depending on their type), but you won't be able to run applications that are designed for some other OS.
To unmount a mounted disk, pop open the context menu for the disk icon as it lies on the desktop and select Unmount.
You can also unmount a disk by repeating the process you went through to mount it: Pop open the desktop context menu, go to the Mount command and select the (checked) disk. The Mount command, in this case, really means "unmount".
 You delete files and folders by dragging them into the Trash
can or by choosing Move to Trash
from Tracker's File
menu. You can also throw an item in the trash by highlighting and pressing the Delete
key (not
the backspace
key). After you've thrown something in the trash, the Trash
can displays rubbish. If you want to salvage a trashed item, double-click the Trash
icon and drag it out of the Tracker
window that opens up.
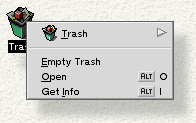
Items in the trash aren't actually deleted until you empty the trash. To do this, you pop open the Trash can's context menu and choose Empty Trash . If you have the Trash window open, you can also empty the trash by choosing Empty Trash from the window's File menu.
