 The Deskbar

 The Deskbar

The Deskbar is a roster of system services and applications. It's divided into three sections: The Be Menu (the portion with the Be logo), the Status View (the darker area that displays the time), and the Application List (the list of running applications).
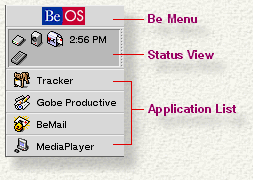
Click the Be logo in the Deskbar, and the Be Menu opens.
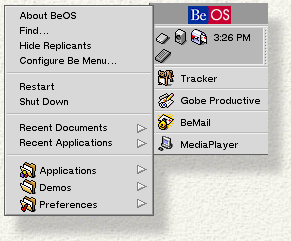
About BeOS. Click this to bring up a panel that displays system information and credits.
Find.... Click this to bring up the system query panel, described in detail in "Playing with Files and Folders."
Show Replicants. A replicant is a "live view" that can be dragged out of its application and dropped onto the desktop. Show Replicants tells all replicants to display their draggers, the little handles that you use to grab the replicant view.
Configure Be Menu... . This selection brings up the Configure Be Menu panel, which you use to modify the Be Menu. The configuration panel is described below in "Configuring the Be Menu."
Restart andShut Down . Both of these items shut down your computer. Restart starts it up again; Shut Down doesn't. (Note that neither of these commands can return you directly to Windows or to MacOS.)

|
If you're having trouble shutting down, you can force the BeOS to stop by typing Alt+Control+Delete twice. The first invocation will launch The Team Monitor; the second invocation will immediately shut down your computer. |
Recent Documents and Recent Applications. These contain lists of recently-used documents and applications. As you open files and launch applications, their icons are automatically added to the Recent... lists.
The folders listed at the bottom of the Be Menu comprise the favorites list --folders that you always want to keep at your fingertips. The list's default contents, shown in the illustration above, are folders full of BeOS applications. You can add your own folders--and files--to this list simply by dropping the item on the Be logo at the top of the Deskbar. You can also configure the favorites list through the Configure Be Menu panel.
Click Preferences... in the Be Menu to bring up the Configure Be Menu panel.
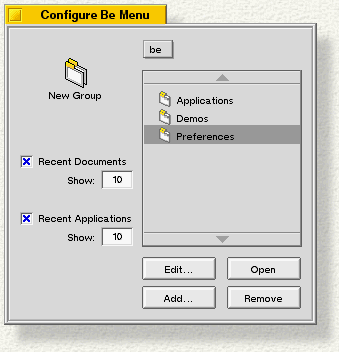
From this panel, you can adjust the contents of the Be Menu. The panel lets you modify the favorites list, and set the "depth" of the recent documents and applications lists.
The favorites list . The scrollable area on the right side of the panel displays the favorites list. To descend into a folder (or "group"), simply double-click the item or click the Open button. To return to a higher level of the list, pop open the menu above the list (the one that's initially labelled be) and choose the level you want to return to.
You can add a new item to any level of the favorites list by dragging and dropping the item into the panel, or by clicking the Add... button and browsing the file system for the item you want to add. To remove an item, click the Remove button. To change its name, click Edit... to bring up the name-editing panel.
To add a new group, click the New Group icon. A group is a "virtual folder" into which you can add other "real" folders or files.
Recent Documents and Recent Applications . The checkboxes let you toggle the presence of the Recent Documents and Recent Applications items in the Be Menu. When unchecked, the items are removed from the menu. The Show: fields let you set the maximum number of documents or applications that you want the Recent... lists to contain.
The Status View displays icons and information about the current state of certain system components.
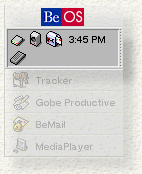
A system service or third-party application can add icons to the Status View to tell you that they're running, and to give you access to commands that control the service or app.
For example, if you click and hold on the the mailbox icon, a menu of e-mail commands pops open, as shown here.
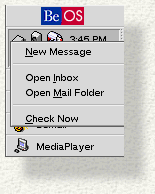
Click on the time and it changes to the date for a few seconds, and then returns to the time. Click and hold on the time to open a menu that lets you hide the time display; click and hold again where the time used to be to bring it back. To set the time and date, see the Time preference.
The bottom portion of the Deskbar is taken up by the Application List, a list of currently running applications. When you launch an application, it's automatically added to the Application List.
Click on an application in the list to pop open the app's App Menu
; 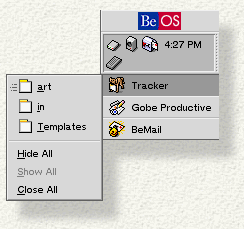 this is a list of the app's windows, from which you can select a specific window to bring to the front of the screen. The App Menu
also lets you hide, show, and close all windows that belong to the application.
Window icons that appear gray in the App Menu (such as home, as shown here) represent windows that have been hidden. A hidden window can be "unhidden" and brought to the front of the screen just like any other window--simply select the hidden window in the App Menu. (To hide a window, double-click the window's title tab.)
"Speedlines" next to a window icon (see apps in the illustration) indicate that the window is in a different workspace (or "virtual desktop"). Clicking on the icon displays the window by taking you to that workspace. See Workspaces for more information on workspaces.
You can open a file in one of the applications that's displayed in the Application List by dragging the file over to the list and dropping it on the app's icon. Not every application can open every type of file, however. If the application can handle the file, its list entry (in the Application List) will darken as you hold the file icon over the application's icon.
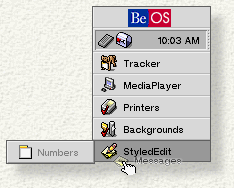
In the illustration, we've dragged a text file called Messages onto the entry for the BeOS text editor, StyledEdit. StyledEdit knows how to open the file, so its list entry darkens. If we drop the file icon, the file will open in StyledEdit. (The Numbers window is a file that's already open in StyledEdit.)
When you start BeOS, the Deskbar appears in the upper-right corner of the screen. To move it to any of the four corners or to spread it across the top or bottom of the screen, grab the dotted border at the right of the Status View and drag.
When the Deskbar is in the top left or top right corner of the screen, it can appear expanded or compact. By default, the Deskbar is expanded, as shown in the previous illustrations. To compact the Deskbar, press the dotted line (on the right of the status view) and drag up. When the Deskbar is compact, the Application List turns into a blackboard icon.
